Ceiling Leak Water Damage in Rainier
A spreading ceiling mark needs investigation above the paint. The source may be plumbing, roof entry or equipment, and the cleanup plan must account for the condition of the suspended materials beneath it.
(888) 509-1696Discuss the overhead water path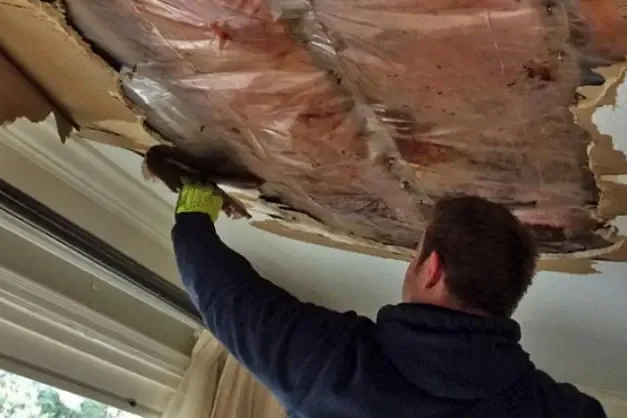
First steps for ceiling leak water damage
- Clear the overhead hazard. Keep furniture access and foot traffic away from softened or bowed ceiling areas. Do not stand below the damage to inspect it more closely.
- Describe what is above. Identify an upstairs bathroom, attic or equipment area if known. Mention any relationship between dripping and water use without operating fixtures to reproduce the leak.
- Preserve safe observations. Take photographs from outside the affected area and record changes in the mark. Note any dripping from lights or movement in the ceiling surface.
- Coordinate access on both levels. The inspection may need the source room as well as the ceiling below. Arrange permissions and keys so the water route can be evaluated together.
A ceiling leak in Rainier should be traced before the repair scope is chosen. The useful observations include when the mark appeared, what occupies the space above and whether dripping changes with fixture use or rainfall. Those details help direct the inspection toward the actual source.
The room above can explain the room below
A bathroom, pipe connection or roof opening can each create an overhead stain. Inspection compares those possibilities with moisture readings and accessible observations. If the source is a failed supply connection, burst pipe damage cleanup may also be relevant to the water path.
Plan removal around material condition
Drywall that has softened, bowed or separated needs a protected area beneath it. Removal should be controlled, with contents relocated or covered and an appropriate path for debris. Opening the ceiling also allows insulation and framing to be assessed instead of hiding them behind a cosmetic patch.
- Record the stain outline and any displacement before work begins.
- Check adjoining wall tops where water may have traveled sideways.
- Identify lights or other electrical fittings within the affected section.
- Compare the visible ceiling mark with moisture beyond its edge.
The Lewis and Clark Bridge crosses the Columbia River between the city and Longview, while US Highway 30 provides another location reference. When arranging property access, the important interior detail is which floor contains the damaged ceiling and whether the room above can also be inspected.
Give the repair contractor an open cavity record
After source control and necessary removal, the remaining overhead structure needs a drying assessment. Insulation can obstruct moisture removal, and wet framing may need more attention than the exposed face of the drywall suggests. Equipment placement should follow the materials and accessible cavity arrangement.
Closing the opening belongs after suitable checks. The handoff should describe the original source, areas opened and condition of retained materials. That information lets the next trade plan insulation, board replacement and finishing around the actual assembly rather than a photograph of the old stain.
A sagging ceiling should never be punctured by an occupant to drain it. Sudden release of water or material can injure someone below. The room should remain clear when movement, cracking or wet electrical fittings indicate that safe access requires professional assessment.
Ceiling damage needs a safe view of both the room and the space above it. Describe the mark, any sagging and the known source so access can be planned around the overhead condition.
(888) 509-1696Assess the wet ceiling sectionWhat does ceiling leak water damage cost in Rainier, OR?
Ceiling leak mitigation in Rainier uses planning ranges of $1,000 to $5,000+. Access, wet insulation and connected interior layers affect removal and drying costs, with source repairs and ceiling replacement described separately.
Small overhead loss
$1,000 to $2,000
- Limited ceiling opening
- Localized moisture inspection
- Protected room access
Several wet bays
$2,000 to $3,500
- Broader insulation assessment
- Connected framing checks
- Additional overhead handling
Layered interior damage
$3,500 to $5,000+
- Multiple affected finishes
- Complex cavity access
- Expanded structural drying
Estimate only. Water category, affected materials and access determine the scope. Compare the inputs in the water damage cost calculator.
How ceiling leak water damage progresses
- 1
Trace the overhead source
The inspection compares the damaged ceiling with the room or attic above. Plumbing, roof and equipment findings establish which source work is needed.
- 2
Prepare the area beneath
Contents and access routes are protected before controlled removal. Electrical concerns and unstable material conditions are addressed in the work plan before the ceiling is opened.
- 3
Assess the exposed assembly
Wet insulation and damaged board are evaluated for removal, while retained framing receives moisture checks. The cavity layout determines appropriate drying access and equipment placement.
- 4
Record closure conditions
Measurements and source repair information are assembled for the handoff. The repair scope identifies remaining openings and the materials to replace once the assembly is ready.
Related water damage services in Rainier
Ceiling Leak Water Damage questions in Rainier, OR
Can a ceiling leak come from something besides the roof?
Yes. Plumbing fixtures, supply connections and equipment above the room can release water into the ceiling. The timing of the drip and the arrangement above it help focus inspection. Source diagnosis should precede cosmetic repair or replacement of the damaged board.
Should a bulging section be drained by the homeowner?
Occupants should keep away from a bulging ceiling instead of puncturing it. The section can release water and material abruptly. Controlled access belongs in a professional plan that considers electrical fittings, contents protection and the stability of the overhead assembly.
Why inspect beyond the visible stain?
Water can travel along framing or the back of ceiling board before a mark appears. The visible outline may be smaller than the wet area. Measurements beyond that outline help determine the access and drying needed for the actual material condition.
Does wet insulation always show through the ceiling?
Insulation can hold moisture above a finish before the room shows obvious symptoms. An accessible cavity inspection helps identify that retained water. The decision to remove insulation should account for condition, exposure and its effect on drying the surrounding structure.
What happens to ceiling light fixtures in the wet area?
Wet electrical fittings need assessment by a qualified electrical professional. Occupants should avoid operating switches or approaching affected fixtures through wet areas. The mitigation plan should account for electrical safety before overhead removal or drying equipment is introduced.
When is a patch ready for final finishing?
The source needs to be resolved and retained materials assessed for suitable moisture conditions. Damaged board and insulation may require replacement before finishing. The repair contractor should receive the source findings and drying record so closure follows the assembly's condition.
Ceiling leak water damage in Rainier
Rainier ceiling assessments need the affected room, the space above it and any signs of movement described before access and material removal are planned.
The same service nearby: ceiling leak water damage in Kelso, Longview, Ridgefield.
Include the room directly above
Photographs taken from outside the hazard area and notes about when dripping began help connect the visible damage with the source investigation and removal plan.
(888) 509-1696Arrange an overhead damage inspection