Ceiling Leak Water Damage in Kelso, WA
A damp ceiling below a bathroom or supply pipe needs more than stain treatment. Kelso restoration teams identify the wet overhead layers, coordinate source correction and dry the cavity before the ceiling closes again.
(888) 509-1696Assess the ceiling before repair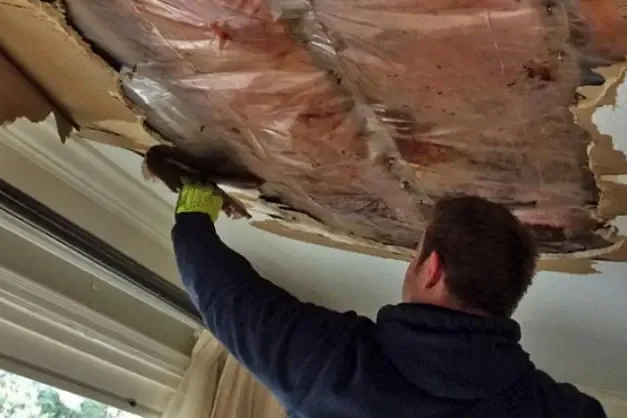
First steps for ceiling leak water damage
- Clear the area below. Keep people and furniture away from sagging or actively dripping ceiling material. Use a dry route to leave the room if stability is uncertain.
- Pause the suspected fixture. Stop using an upstairs appliance or bathroom linked to the drip. A plumber checks the source before normal use resumes.
- Note the pattern. Record which activity starts the leak and where staining expands. Share safe photographs with the technician before any ceiling material changes.
- Plan access. Describe the rooms above and below, including occupied areas and wet fixtures. The contractor establishes safe isolation and controlled cavity opening.
Ceiling damage often begins above the room where it becomes visible. A fixture connection, appliance supply or overflowing upper bathroom can wet several joist bays before a stain forms. The contractor checks the source room and the cavity below, keeping people outside any unstable area.
Identify what feeds the overhead moisture
The owner should describe whether dripping follows plumbing use, whether a fixture overflowed and whether an upper room has wet flooring. That history helps distinguish an interior source from roof entry. A plumber confirms a supply or drain defect; restoration personnel assess the materials reached by the escaping water.
A property in West Kelso may have a different floor assembly from one in Aldercrest or near Lexington Avenue. Technicians inspect the actual joists, insulation and finish layers. They establish the building layout during the inspection.
- Compare the wet ceiling with the room and fixtures directly above it.
- Check edges of adjoining bays where water follows framing or penetrations.
- Record sagging, detached finishes and affected electrical fixtures before access.
- Photograph the cavity after safe opening to show concealed wet layers.
Open the cavity with a safety plan
Wet drywall can lose strength and release trapped water suddenly. Qualified personnel assess electrical isolation and controlled removal before anyone works underneath. The contractor chooses an opening large enough to inspect and dry the affected layers while protecting the occupied space below.
Insulation and enclosed framing need separate decisions. Removing a wet ceiling surface alone may leave moisture against joists or the upper subfloor. The drying team directs equipment to the retained assembly and checks progress at repeatable locations.
Close the ceiling after the readings support it
The repair sequence follows source correction, material decisions and drying clearance. Technicians record the starting and final conditions before replacement drywall hides the cavity. The owner keeps those records with the plumber invoice and photographs of the upper-room source.
- Confirm that the upper fixture or pipe no longer introduces water.
- Record which insulation and finish layers required removal.
- Monitor retained wood and the upper floor separately from room air conditions.
- Schedule painting and ceiling closure after the measured drying endpoint.
Do not stand under bulging drywall, remove a wet light fixture or use a ladder on a damp floor to investigate a drip. Water can collect above a fragile ceiling surface. Keep the room clear and arrange safe source control, electrical isolation and controlled overhead access before restoration personnel open or dry the cavity.
A wet ceiling needs a source check above and a safety check below. Describe the fixture use, visible sagging and affected rooms so restoration personnel can plan access without overlooking the concealed water path.
(888) 509-1696Arrange an overhead assessmentWhat does ceiling leak water damage cost in Kelso, WA?
Ceiling leak mitigation often ranges from $1,000 to $5,000. The cost changes with overhead access, insulation, affected joist bays and contamination, while plumbing correction and ceiling refinishing can add separate charges.
Small overhead loss
$1,000 to $2,000
- Source-room inspection
- Moisture mapping
- Limited cavity drying
Several wet bays
$2,000 to $3,500
- Controlled ceiling opening
- Insulation assessment
- Framing measurements
Layered interior damage
$3,500 to $5,000+
- Upper-floor checks
- Expanded material access
- Documented repair handoff
Estimate only. Water category, affected materials and access determine the scope. Compare the inputs in the water damage cost calculator.
How ceiling leak water damage progresses
- 1
Check upper and lower rooms
Technicians compare the visible ceiling damage with plumbing use and moisture above it, recording the affected route before choosing an access point.
- 2
Make controlled access
The contractor addresses electrical and falling-material hazards, then opens wet ceiling layers as needed to inspect insulation, joists and the upper subfloor.
- 3
Dry the cavity
The drying team manages airflow and dehumidification around retained materials, checking deeper layers and adjacent bays that can stay wet after surfaces improve.
- 4
Document closure readiness
Final readings and source-repair details establish the handoff for insulation and drywall work, preserving a record of conditions that the new ceiling will conceal.
Related water damage services in Kelso
Ceiling Leak Water Damage questions in Kelso, WA
Can an upstairs bathroom leak reach another room?
Water can follow joists, pipe penetrations and floor seams before appearing below. The contractor checks adjacent bays and the upper floor rather than using the stain as the only boundary. Plumbing use and the moisture map help locate the route.
Is a brown stain enough to identify the source?
A stain records where moisture reached the finish, but its color does not identify the failed component. The technician compares the pattern with upper-room use, pipe locations and roof conditions. Source testing and material readings guide the restoration plan.
Can a wet ceiling dry without opening it?
That depends on the assembly, insulation, saturation and safe drying access. A contractor evaluates whether retained moisture can leave the cavity effectively. Some ceilings need controlled opening or insulation removal before joists and upper subfloor layers can reach the drying goal.
Should lights in the wet area be used?
Do not operate or handle fixtures affected by water until qualified personnel assess them. Wet wiring and fixtures require an electrical safety decision separate from drying. The restoration crew needs a safe power and access plan before working under the ceiling.
Who repairs the cause and who repairs the ceiling?
A plumber or other appropriate trade corrects the source. Restoration personnel handle water removal, material decisions and drying. A finish contractor repairs the ceiling after clearance. The owner should confirm those scopes and the order before authorizing closure.
What shows that a ceiling cavity is dry?
Documented readings from the retained framing, drywall and upper-floor materials provide the evidence. Technicians compare them with suitable dry references and check areas that released moisture slowly. Room humidity and a stain that stops growing cannot replace material measurements.
Ceiling leak water damage in Kelso
Coverage includes ZIP 98626, West Kelso, Aldercrest and the Lexington Avenue area. Describe the entry point, affected rooms and safe access when arranging a visit.
Nearby service areas include Longview, Rainier and Ridgefield.
Dry the cavity before the ceiling closes
The restoration team inspects wet insulation and framing, follows material readings and records the condition needed before overhead finishes return.
(888) 509-1696Discuss the ceiling cavity